NYC ROOF.
Introdution to materials, processes and technical skills in art & design
 Screen Shot 2015-09-29 at 12.03.57 |  Screen Shot 2015-09-29 at 12.03.36 |
|---|---|
 Screen Shot 2015-09-29 at 12.03.16 |
For our next project we have to create a roof top of New York City using a software called Maya. Before we got to begin with creating the roof tops we had to do a small exercise which helped us get used to the software and work out what tools to use. We had to create a house, at first I was struggling a lot but after some time I got the hang of it.I started by placing a polygon cubes into and next to each other to create to overall shape.
If I wanted to create a window or door I would have to go to the Mesh tools and select the Connect tool which would increase the number of polygons, later i would select faces and extrude them either in or out depedning on how I want the windows to look.


We also had other task to do which was creating a spaceship.This was quite a chalenge I really struggled with it. Eventually I ended up with this and I believe I done the best I could. Creating spaceship wasn't easy, we had to build it up from blocks and then change the shape of it by using edge tool.
This is the research that I have done about New York City roof tops, I have found serveral images that come from video games such as Spiderman or GTA V. I also found some images taken by people, my main focus was how the roof looks from the birds point of view and what kind of stuff should be placed on there. I will be using these images as reference for my project.
Learning and experimenting with textures
Today I have learned how to put texture or an image on my design, I quickly came to a resealsation that It's not an easy task, There are a lot of tools and things that I have to remeber such as assigning new materials.
Each texture makes the design look different, I can either make it look like an item is made out of glass plastic or even wood. I believe that at some point during this project I will be able to create a texture without any problem.


Progress.
This is my design of New York city builidngs and roof tops, so far i dont have much but I have some intresting ideas on how to design this place, I want to create a small park on one of the builidings, it will have trees and grass, so far thats only an idea but I think that if I do that it will make my game look intresting and different.
I've spend most of my time creating ladders that connect all the buildings and a water tank on the top of a roof. I want to create more builidngs so the project will look well developed.

 |  |  |  |  |  |  |
|---|---|---|---|---|---|---|
 |  |  |  |  |
Research


Continuing with Maya


At the end of the day when I looked at the work I produced I realised that this isn't exactly what I want my builidngs to look like, so the next day I started adding more details, i especially focused on creating the stairs and placing them all around. I also copied and pasted water towers and placed them on every builidng.
I ended up adding more bigger and taller blocks behind the ones I already had, on some of the roofs I have placed lttle houses/shelters because I've seen them on some of my reference pictures and decided to do the same.
To make it look more detailed I made windows. I want to add bilboards and when i start creating texture I am planning to add a lot of graffiti all over the place to make it look like the old New York city.

applying Textures


To apply a texture to something first we have to select the face of the object. Then we have to right click and select a new material.

After we have selectd a new material we will end up with a box which has a list of different textures to choose from, I selected Lambert. After that where it says "colour" I will click on the small box on the right side, then another box with a list of diffeent textures will appear, and because I want to place an image over my builiding I select the option where it says "file"
After I have selected an image and placed in on my builiding It will look fine on 2 sides of the building however, the other 2 sides of the block will look different because the image will stretch, to fix this I will go to UV and select "Planner"and click on a small box. Planner can help me with fixing the stretched picture. I will select either X,Y or Z axls depending the angle where the face of the object is.
This thing helps me to see which axis to select.
After I chose the right axis I can click on "Apply" to adjust the size of the image.
 |  |  |  |  |  |
|---|
I am almost done with my work, all I have to do left is add more texture to some parts and decide on the picure that will go behind my buildings, I am considering placing Brooklyn at sunset as my backround. I think one of the main reasons why i chose to represent Brooklyn through my project is because I believe that specific area seems really stereotypical for New york, walls covered in street art/graffiti, lots of builings placed really close to each other and pretty lights. Brooklyn also has a breath taking view to the city on the other side of the river. I really like the consept of it and will like to include that in my work
Mood board / deciding on the backround


These are some pictures of my rendered work so far, I have done a lot of texturing and tried to use different patterns/textures for each builing. I also paid attention to small details like the rust on mental stairs and ladders.Although my work looks close to finish I would like to add more details to it if I get the time, I will like to make sure the the place is covered in Graffiti because like i mentioned ealier I want to recreate Brooklyn.
When I started to look for good angles to render my work I wanted it to look as if the audience is there looking at things from the characters point of view. I took screenshots of different angles.
I like the one where you can see the builingds from the ground level as if the person is admiring the city from up close.
I have also taken renders of angles where you can see the stairs and what the rooftops would look like after you go up them.
Also, I like the way i rendered most of the work by going to the highest building, The angle makes It possible to see everything from birds point of view.
Bump Mapping + Texture
Bump mapping is a technique that you can use
on computer software's such as Maya, The
creator of bump mapping is a man called James Blinn.
The technique allows you to be able to
simulate wrinkles or bumps on an objects
surface.
This method creates an illusion to fool us to
believe that there’s different verifications of
height or relief along the surface of an object.
It increases the effect of the object looking realistic or overall appeal of your image. Bumb mapping
has a really important job in computer graphics,
It allows something to look as if its 3D when
actually its a flat surface. Its created by reading
the black, white and grey scaled data stalled in the bumpmap, When the surface has a dark area it gets pushed in which creates the shadow or crater effect while the brighter area gets pushed out, it gives an effect of a raised
surface. Bump map can help with creating the illusion of
depth and surface.


3D ANIMATION -
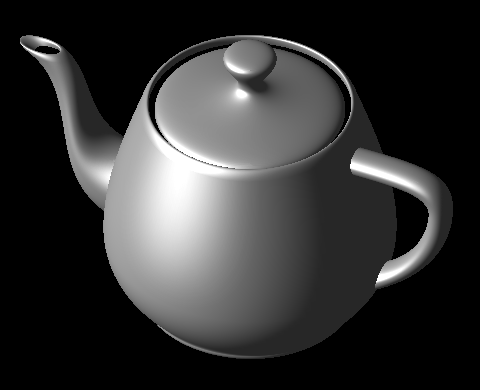
UTAH TEAPOT & Martin Newell
Utah Teapot is an inside joke in the worlds of Animation. Martin Newell was looking for a basic
geometric shape he could to
test rendering and light set ups on. His wife suggested to use
the teapot that they were using, which later he sketched out andwent back to the lab and
created theteapot in 3d on his
computer,later on he made the
design of the teapot publicly
available. Turns out that teapot was an amazing tool for testing in the world of CGI, because it
has convex and concave
surfaces, it can self shadow and was easily recognisable. Back
in 1975 the software didn't
used to be as sophisticated as
it is today, the animation didn't
used to come with re loaded
shapes or modelling packages,
people back then had to sketch everything out everything on
graph paper. The teapot gave
access to all those criteria.
Even today the teapot found its
way to the basic shape into the
likes of auto cad light wave, 3ds macs and of course rendering.
What i really like about it is that
the teapot makes an appearance in a lot of Pixar animated
movies such as Toy Story or
Monsters Inc.
The teapot is also popular
outside of Pixar, Its been spotted during one of the episodes of the Simpsons where homer
discovers the 3D world or even
the Pipe screen saver from the
90’s.


The video has been created and uploaded to youtube by a man named Alex Romen, It had a really big inpackt on the way we see and create the architectural visualization. Before Alex Bromen's the third & the seven technique came along people would
make simple videos showing how and what they done with their design.
The third & The seven rule was a lot different from what people seen so far during
that time, what made it so different and unique was the pacing, instead of having
quickly moving pictures he decided to make the shots appear slowly which would
make the audience look more carefully at the items and the area.Alex made the videoreally detailed and considered all different angles , he planned his shots before
taking a picture of his work. When I have first watched the video I was amazed by
how detailed and realistic everything looks, the location takes place in a fictional
library.


I decided to take a picture from this angle because it shows everything that I have done including the images that are being used as the background. The render haven't came out too well, the lighting is too dark which makes the buildings a little hard to see

I really like the angle that I took the picture from. It shows the second highest building with water towers on it, I also like how well the background and he lightening go with it. I decided to use the rule of thirds for this render.

I wanted to include this image with this specific angle for a few reasons. I wanted the audience to focus on the graffiti on the wall and give the effect to looks as realistic as possible
I decided to take a picture from this angle because it shows everything that I have done including the images that are being used as the background. The render haven't came out too well, the lighting is too dark which makes the buildings a little hard to see

I have added texture onto my watertowers and I believe it came out really well, I made sure that the metal looks old and rusted and i made everything else appear to be made of wood.
To save myself some time I will copy and paste the watertower that already has texture on it and place the copies on my other buildings.
After I have sculptured and textured my city I took a lot of pictures from different angles, I wanted to show all the buildings, hwo well the lgihting falls on the rooftops and i wnated the audience to be able to notice the smallest details.
When we first started usinbg Maya I have strugglued a lot with everything, the software seemed really complicated and confusing, but as time passed i started to learn the short cuts and what tools to use for certian things, like texturing or insterting egde loop.
Over all I liek my city, I believe that I done the best I could at this stage, i have never used Maya before but im still pleased with my work.
I believe that if I had more time I would sculpture more things like secret rooms or moving fans, maybe even animate something like some of my class mates did, Although I found this project hard I believe it was still fun and I have learned a lot not only about the software but also other things like bump mapping, the third and the seven and even the rule of thirds.